I’ve been checking out the new cookbooks from my library and The Food Nanny Rescues Dinner is the second one recently that I am tempted to purchase. It’s just not recipes but some planning ideas since most of us who cook every night will readily agree that the hard part is NOT cooking: It’s figuring out what to cook!
When I was first staying home with my newborn daughter, after working for 10+ years, my mother said “Plan weekly menus. I did that when you guys were little. And whatever happens, make sure you know by 11 in the morning what you’re fixing that night!” I did the menus. They are a great tool to make sure you are eating a variety of food and let you plan some prep that you can do on an easier night.
So the Food Nanny (Liz Edmunds) has a fun take on this, which is to plan theme nights. Her themes are comfort foods, Italian, Mexican, Meatless/Breakfast for dinner/Fish, pizza, grill night, and traditional Sunday dinners. The book has a nice selection of recipes for each of these themes. You can, of course, make your own themes. Add an Asian night or an Indian night or some other ethnic food you enjoy, make a soup and sandwich night (or salad and sandwich in the summer), etc. It gives you a nice framework to work within and keeps your menu varied, which is nice. I’ve known people who use the same two week menus over and over, with maybe a 2 week cold weather menu and a 2 week warm weather menu. I like to be a bit more seasonal than that. And when I did my menus I always had a night set aside for “new recipe” which was a fun wildcard. On Liz’s web site you can print out blank two-week menus or drag and drop themes and recipes onto the menus and then print them. You can also watch some videos of her helping families plan their own theme nights and menus plus teaching them how to cook a few things.
I think planning for two weeks’ at a time will save you money by virtue of fewer shopping trips. Run in quickly once during that time for milk and fresh produce (and fresh fish) but stick to your list and plan and you’ll save tons of money. Of course, this means you need to plan out lunches and breakfasts a bit too, although I find we’re quite happy eating nearly the same thing for breakfast multiple days in a row. Right now it’s oatmeal for me. (Steel cut oats made in the rice cooker are fantastic!)
The recipes I’ve tried so far include roast chicken with gravy, fired up macaroni and cheese, croque monsieur, and her homemade buttermilk salad dressing (aka Ranch dressing). Still to come this week and next are some yummy sounding fish tacos, buttermilk waffles, and cheese enchiladas with green sauce.
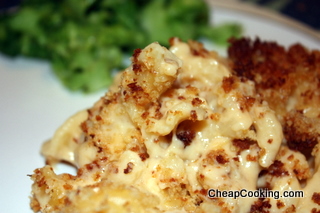
She actually has two recipes for macaroni and cheese in the book. One is very close to my normal, which is here, although hers is lacking the dry mustard. 😉 Tonight I made her Fired-Up Macaroni and Cheese, which adds some Worcestershire sauce, Tabasco sauce and Parmesan cheese to the mix.
Fired Up Macaroni and Cheese
Ingredients
- 2 cups uncooked elbow macaroni or whatever shape you like
- 1/4 cup butter
- 1/4 cup flour
- 2 cups milk
- 1 tsp salt
- 1/4 tsp cayenne pepper plus or minus depending on your spice love
- up to 1/4 tsp Tabasco sauce again, depending on your spice love
- 1 1/2 tsp Worcestershire sauce
- 2 cups 8 ounces grated Cheddar cheese (sharp or medium is best)
- 1/4 cup grated Parmesan cheese
Crispy Crumb Topping
- 2 - 3 slices bread I used a few leftover whole wheat slider buns actually
- 1 Tbs butter melted
- 1/4 cup grated Parmesan cheese
Instructions
- Preheat the oven to 350 F and grease an 8x8 inch pan with some butter or Crisco.
- Bring a large pot of water to boil and cook the pasta according to the directions. When it's done drain the pasta in a colander, but go on to the next step once you've dumped the dry pasta in the boiling water. Just set the timer so you don't forget the pasta!
- Melt the butter over medium heat and then stir in the flour. Use a whisk or a nice flat wooden spoon so you can get rid of any lumps. Cook the flour and butter mix for a minute. If you have a microwave, heat the milk up during this minute. It makes it easier to blend in.
- Add the milk and cook until bubbly and thick, stirring constantly. Once it's thickened, stir in the salt, cayenne pepper, Tabasco and Worcestershire sauce and cook another minute, stirring.
- Stir in the 2 cups of Cheddar and 1/4 cup of Parmesan, until melted. Stir the pasta into the cheese sauce and then pour into the greased baking pan. (Use a spatula to get all the good cheese sauce out!). You can just bake as is for 20-30 minutes but it's better if you add this crumb topping, which adds a nice crunchy touch on top.
- Whir the bread around in your food processor and then mix in the butter and cheese. Sprinkle across the top of the macaroni and cheese.
- Bake 20-30 minutes at 350.
Serve with a green vegetable of your choice. Steamed broccoli goes well.

Leave a Reply